

The BEST Epoxy Floor Company in Beaumont, TX
Epoxy Coatings come in an array of colors, textures and finishes. We utilize diamond tooling to properly prepare the substrate for the best mechanical bond & remove any existing coatings, sealers, or contaminants, so that we begin your project with the strongest foundation possible.

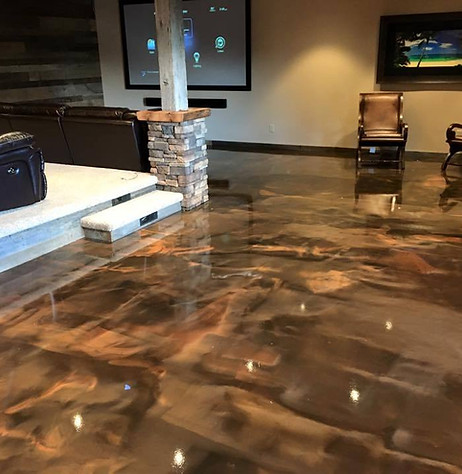
What is a Metallic Epoxy Floor?
It is a multi-layered epoxy painting method that utilizes a metallic component blended with a transparent epoxy to produce eye-catching visual effects known as metallic epoxy. As the epoxy dries, the metallic powder moves through it, providing the lava flow or iridescent effect.

The Floors-U-Adore difference
Creating a top metallic design for your home, garage, or any place in your house is tremendously significant and we make sure to explore every possibility and deliver the best of results on every place we work in!
Top-notch craftmanship
High quality materials
Neat installation
Professional team of workers
Post-installation detailing
Floors-U-Adore epoxy Pro's can help you choose the correct epoxy flooring system that will perform best for the floor's intended use:


Click on any photo to learn more!
Showroom Flooring
Floors, U Adore offers the latest in luxurious metallic flooring. The pigments within the epoxy and polyaspartic coatings create a texture that is absolutely beautiful. It can be customized for any setting so you can find the perfect match for your home or office. A perfect selection for commercial environments and retail showrooms, our metallic floor options exude elegance and create an unbeatable experience for your customers as they enter your establishment.
Homeowners may also improve the value of their home by using metallic epoxy on the floor of their garage. Customizations such as color can be chosen to match whichever setting best suits your needs. Our system is completed with a premium urethane topcoat that will provide a long-lasting finish
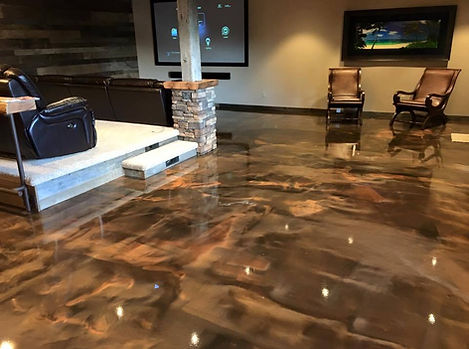

Metallic Flooring System Design
For metallic epoxy flooring, the quality of your final finish is largely dependent on the skills of the installer. Furthermore, the lighting in the space plays a huge role. Most metallic epoxy systems start with a black primer to provide maximum contrast with the floor's shiny finish. This is followed by suspended metallic pigments which have time to conform before being coated. Some of the benefits we offer here are that our epoxy is high quality and clear enough to see through, which allows for the perfect effect.
The metallic epoxy can be reshaped after being applied mechanically or chemically, changing its appearance. Additional colors are also readily available to create an even more amazing look to your floor. When a metallic epoxy coat is cured it can then be sanded and top-coated with a topcoat of your choice. Gloss or satin finishes are available for urethane topcoats, which are highly durable with better traction.
Solid Color Floor Coatings
Floors-U-Adore provides long lasting, high quality floor coatings to commercial & industrial establishments. The Available colors on these coatings provide a variety of options for any type of building. The high gloss and satin finishes give a glossy look which reduces glare and saves energy, helping your business to stand out from the rest.

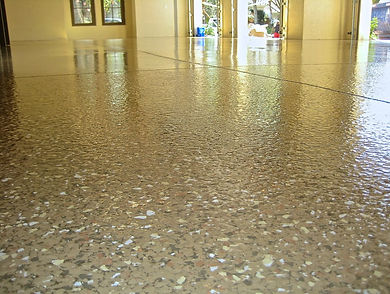
Flake/Chip Broadcast Floor Coatings
Chip broadcast applications use blended vinyl flakes to provide a unique finish. These easy to maintain systems are ideal for both residential garage floor coatings as well as heavy-traffic commercial spaces.
Seamless Quartz Floor Coatings
Quartz systems can be a fusion of various layers of colored quartz aggregate that are all within one resin matrix. They're then topped with coated UV stable coatings to ensure long-term performance. These floors are commonly used in high traffic areas, like warehouses or factories, because their durability is second to none on the market today.
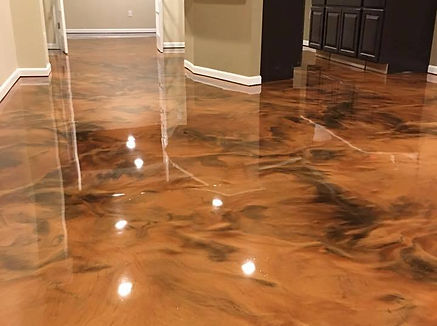

Decorative Metallic Coatings
You can now cover your floors with Metallic Epoxy for a shiny, cool-looking floor that's sure to impress. This product is ideal for showrooms or shops, since it provides superior color depth and design options. These systems are made using the latest metallic pigment technology and come in a variety of colors. If you want to achieve different effects or provide more reflective surfaces, we can adjust them for you.
Why should I pick Floors-U-Adore?
In floors u adore we understand the crucial importance the floor on your home will take, the area it will serve and most importantly the feel it'll have in your home! For us providing the necessary skills, team and experience is a must have, and this is what we deliver to every single client we meet.
Custom Metallic Epoxy Floors costs:
Your project's cost will be affected if your present surface is in bad shape. The price per square foot might vary widely due to the wide range of design alternatives. For example, grinding, staining, and sealing a basic concrete slab will be less expensive than designing a bespoke one. A member of our installation team will guide you through the process and help you decide EXACTLY the appearance and finish you want. Contact us right away for a free design consultation!
Here's how we do it!
Step 1: The Tools And Materials
Installing a metallic epoxy floor requires many tools to do it right. The three most difficult steps are surface preparation, mixing and application. One of the most important tools is a stand-up or handheld grinder with diamond tooling, the correct type of roller applicators, your metallic epoxy kit, spike shoes, mixing paddles, premium urethane topcoat as well as many other items. Some people use the wrong cleaning methods and just can't achieve the necessary concrete surface profile required for metallic epoxy application. The best way to do so is by grinder or media blasting the surface. If you aren’t going to do that, just use concrete paint, because the epoxy resin won't be able to bond with the concrete base properly unless it is ground down and porous.
Step 2: Choosing Metallic Pigments
To create an epoxy floor in 3 colors, for example black, red, and silver. Make sure to split the pigment evenly between the colors. For example, 50% of dark red pigment, 30% of dark silver pigment, and 20% black pigment. The metallic pigments or dyes are added to a high-quality, clear epoxy. Basically epoxy is a type of resin that can contain different metallic pigment colors. A floor could have up to 5, but we recommend using two or three. If you use too many, it will start to look too busy, and muddy the overall appearance.
Step 3: Concrete Surface Preparation - CSP
It's important to prepare the surface of the concrete before starting work. This is done by profiling the concrete, which makes it rougher so that paints and sealants can stick better. It also creates little 'abrasions” of sorts on the surface. By profiling the surface of the concrete, you are creating tiny ridges that allow the epoxy to grip onto it better.
For epoxy to adhere properly and create a suitably strong bond, the concrete surface should have a CSP of at least 2. If it is too worn, imperfect or damp then it should be recoated before any more procedures are attempted. If you need a CSP 2, the surface can be ground with a 16-grit diamond tooling. If you need a CSP 3, use a shot blasting machine. Once the surface is vacuumed it is ready for an epoxy coat. Ensure you have removed all visible dust before proceeding with the coating procedure.
A thorough grinding and vacuuming of the concrete slab will make the end result much better. It can be really hard to clean the floor so that it is 100% debris free. There's dirt and dust sticking to the floor from simply air movement throughout the room. The EZ Roller is an 18-inch roller with perforated sheets that are sticky like lint rollers. It is designed for cleaning smaller particles - even those unseen, and can help when properly preparing the surface.
Step 4: Installing A Concrete Moisture Barrier
Manufacturers usually recommend coating new epoxy floors with a layer of moisture/vapor resistant barrier. The moisture barrier acts as your primer (1st coat.) Epoxy coatings are not breathable, meaning any moisture that gets through can cause them to fail. A key sign of this is bubbles or peeling. Moisture barriers are rated based on how much hydrostatic pressure they can withstand. Most of these are generally around eight to ten-pounds of hydrostatic pressure, while others can withstand up to 25 pounds. If you have any doubts or concerns about moisture in the concrete, it's important to conduct readings in different areas. Otherwise, all your work will be for nothing.
Always use the ratio that the manufacturer has preset to mechanically mix resin with hardener. If you're using a 2:1 ratio, then you'll need 2 parts of A to 1 part of B. Mix the ingredients for two-three minutes, being careful to avoid bringing air from outside into the mixture. Proper mixing can help you avoid getting bubbles trapped in the bucket and ending up on the floor. Once you have your resin and hardener mixed, quickly apply the mix onto the floor in thin ribbons. The material must be applied systematically with a crew before it starts to set up & become unworkable.
When it comes to applying an epoxy moisture barrier, you should always wear spiked shoes and use a mohair roller. To make sure the moisture barrier/primer is evenly applied, you should back roll the surface. This is the solid color base coat, which means it’s not really important to apply it perfectly. You just need to make sure you cover the moisture barrier in an even layer at the manufacturer’s recommended thickness (mil).
Step 5: Cleaning up
Once the moisture barrier has dried, use a microfiber mop and acetone to clean all dust off the floor. The floor must be well-cleaned & prepped in order to avoid unsightly "comets" when the metallic epoxy is applied.
Step 6: Mixing Metallic Epoxy
To make your metallic epoxy coating look nice, you need to mix two parts epoxy resin with the appropriate pigment. Before you start metallic flooring project, make sure you have enough metal pigment for the amount of color you want in the finished product. You’ll need multiple mixing containers, and have them pre-mixed and ready to pour.
The best way to achieve great blending of the pigments is to mix them into part A thoroughly before adding part B. A dust mask should be worn when working with metallic pigment because the small particles can enter to the lungs.
Combine the two parts of the metallic epoxy and mix them for 2-3 minutes. Be sure to strain the mixture with a strainer to make sure there are no clumps or debris before pouring it.
Step 7: Application of Metallic Epoxy
As stated, the metallic coat should be poured out in small ribbons. Quickly empty the contents of the bucket. Do not tip it over on the floor. A and B can mix and harden in their container. Sometimes part A or B can stick the sides of the bucket, and cause soft, uncured spots - best to just empty the bucket and set it aside rather than turn it over on the floor.
Put spiked shoes back on and using a Magic Trowel or a foam roller, spread the material around evenly. A notched squeegee can help with making sure you’re applying at the correct mil.
Adding different colors to the already-layered metallic epoxy can be a great way to accentuate certain areas. You can also try different techniques like “figure eights” or “river flows” to manipulate the overall appearance. The working time for metallic epoxy can be 25-60 minutes. Avoid overworking the epoxy, because it may start curing.
Step 8: Applying a Protective Top Coat
Generally, the experts refer to this as the money step. It is a very important stage of the metallic epoxy color application process. Consideration should be made for whether or not to install a protective coat that has a gloss finish or a satin finish. Protective coatings can have somewhat of an “orange peel” texture, but offer the maximum protection for your floors. If you live in an area where traffic is heavy or sun exposure is high, it's recommended that you use a polyaspartic or urethane sealer. Polyaspartic top coating is great for protecting your epoxy from UV exposure. It also provides some additional scratch protection for the resin, because this hybrid coating offers exceptional scratch protection. However, no coatings can offer 100% protection against scratching & scuffing over time.
Note: Custom Metallic Epxoy floors is not an easy task. This is a job that can be done by our expert contractors.
Floors-U-Adore is your first choice for custom metallic epoxy floors in all of Beaumont Texas!
We offer an assortment of floor coating solutions to suit your needs. With epoxy, urethane, polyaspartic and polyurethane concrete coatings to back up our product line, Floors-U-Adore is sure to be your first choice for floor protection & enhancement. Floors-U-Adore is well established and specializes in concrete protection for your home. Their systems have been perfected over the years so you can expect long lasting beauty with minimal maintenance.
With our line of floor coating systems, you can choose from a variety of options. Solid colors, chip floors, seamless quartz and metallic decorative floors are all available. Floors-U-Adore offers a variety of custom finishes to suit your specific requirements. If you need any help or have questions about a new project, please feel free to contact us!
We let our reviews speak for ourselves!

I’ve used floors I adore several times now. They are always prompt, courteous and reliable!

We were VERY pleased with the services of Floors-U-Adore today!!

Did a wonderful job!


